USD ($)
$
United States Dollar
Euro Member Countries
¥
China Yuan Renminbi
$
Australia Dollar
R$
Brazil Real
лв
Bulgaria Lev
$
Canada Dollar
$
Chile Peso
$
Colombia Peso
Czech Republic Koruna
£
Egyptian Pound
Ft
Hungary Forint
India Rupee
Rp
Indonesia Rupiah
Israel Shekel
¥
Japan Yen
Kazakhstani Tenge
kr
Denmark Krone
$
Hong Kong Dollar
£
United Kingdom Pound
Korea (South) Won
$
New Zealand Dollar
Russia Ruble
Viet Nam Dong
د.إ
United Arab Emirates dirham
CHF
Switzerland Franc
kr
Sweden Krona
kr
Norway Krone
$
Singapore Dollar
R
South Africa Rand
$
Mexican Peso
Turkey Lira

The Capo

Lesson 3/79 | Study Time: 5 Min
The Capo

The Capo

The capo is a device which is placed across the neck of the guitar (acting as a movable nut). It has 2 uses:

1. To enable the use of easier chord shapes, without changing the key of a song.
2. To change the key of a song, without changing the chord shapes.

Expanding upon point 1, if a song is in a key which is within your singing range, but involves playing difficult chords (e.g., in the key of Eb), a capo may be used.

Capos come in various shapes and sizes.

The capo allows you to play the song in the same key, yet at the same time use easier (open) chords. Consider a turnaround in Eb:

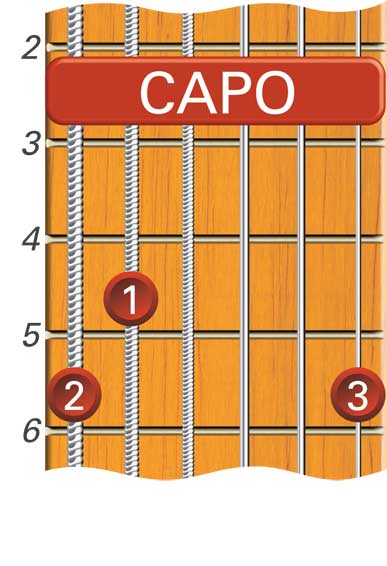
If you place the capo on the third fret, the following chords can be played without changing the song’s key.

(C chord shape with capo)

(Am chord shape with capo)

(F chord shape with capo)

(G chord shape with capo)

If you have studied bar chords, you will notice that the capo is acting as a bar.

To work out which fret the capo must be placed on, simply count the number of semitones between the "capo key" you have selected to change to (e.g., C, the second part of the previous example) and the original key (i.e., Eb, the first part of the previous example). Hence C to Eb = 3 semitones, and therefore the capo must be placed on the third fret.

Expanding upon point 2, consider a song in the key of C, using the turnaround progression:

A singer may decide that this key is unsuitable for his or her voice range and may wish to use the key of, say, Eb. The progression, transposed to Eb, will become:

Instead of changing to these new chord shapes (i.e., having to use bar chords), the guitarist may still play the C, Am, F and G chords, but must place the capo at the 3rd fret to do so.

(C chord shape)

(Am chord shape)

(F chord shape)

(G chord shape)

Original Key (C)

Original Key (Eb)

* Remember you are not actually changing key but merely changing the chord shapes, for ease of playing.

Gary Turner and Brenton White

Gary Turner and Brenton White

Product Designer
5.00
Profile

Class Sessions

1- Triplets 2- Arrangements 3- Fingerpicking Pattern Six 4- Fingerpicking Pattern Eight 5- LESSON EIGHT 6- Bass Note Runs 7- Fingerpicking Pattern Twelve 8- Fingerpicking Pattern Seven in <span class="symbolA">)</span> Time 9- The Pinch Technique 10- Fingerpicking Pattern Four 11- The Hammer-On 12- The Hammer-On 13- SECTION TWO 14- Clawhammer 15- Clawhammer - The Pinch Technique 16- 6-String Clawhammer 17- Clawhammer in <span class="symbolA">^</span> Time 18- Staccato Bass 19- Fingerpicking Pattern One 20- INTRODUCTION 21- GLOSSARY OF MUSICAL TERMS 22- Song List 23- Transposing 24- The Rudiments of Music 25- SECTION ONE 26- Tuning 27- The Slide Finger 28- SUPPLEMENTARY PIECES 29- Fingerpicking Pattern Three 30- Alternating Bass 31- Group One 32- Approach to Practice 33- Note Values 34- Step 1 Write Down the Melody 35- The Capo 36- Progression One 37- Turnarounds 38- Blues Progression 39- Combining Hammer-On and Flick-Off Techniques 40- Fingerpicking Pattern Seven 41- Turnaround in C 42- Fingerpicking Pattern Two 43- Fingerpicking Pattern Five 44- Section One Summary 45- Acoustic Guitars 46- Time Signatures 47- Group Two 48- Fingerpicking Pattern One-A 49- Step 2 Add the Root Note in the Bass 50- Fingerpicking Pattern Two-A 51- Progression Two 52- Songs 53- Seating 54- Step 3 Add a Harmony* Note to the Bass (A Middle Voice) 55- Notes in the Open Position 56- Progression Three 57- Right Hand Finger Names 58- Step 4 Add a Harmony* Note to the Bass (A Middle Voice) 59- Chromatic Notes 60- Progression Four 61- Progression Five 62- The Position of the Right Hand 63- Notes on the Guitar Fretboard 64- Step 5 Combine the Bass and Middle Voices 65- Progression Six 66- Step 6 Select a Different Bass Note 67- Tablature 68- The Freestroke 69- The Rest Stroke 70- Step 7 Syncopate the Bass 71- Progression Seven 72- Right Hand Fingernails 73- Step 8 Harmonize With Thirds: 74- Progression Eight 75- Step 9 Add a Third Harmony Above the Melody 76- Progression Nine 77- Progression Ten 78- Step 10 A Final Arrangement 79- Alternative Arranging

GDPR

When you visit any of our websites, it may store or retrieve information on your browser, mostly in the form of cookies. This information might be about you, your preferences or your device and is mostly used to make the site work as you expect it to. The information does not usually directly identify you, but it can give you a more personalized web experience. Because we respect your right to privacy, you can choose not to allow some types of cookies. Click on the different category headings to find out more and manage your preferences. Please note, that blocking some types of cookies may impact your experience of the site and the services we are able to offer.